Updated on December 30, 2021
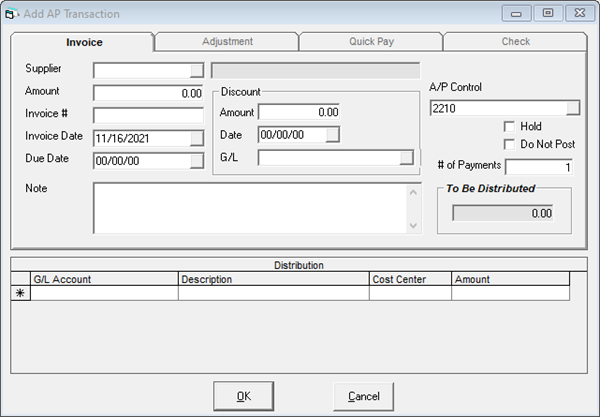
Start by clicking on AP > Transaction Processing > Add > Invoice > OK.

The supplier this invoice is from. Start typing to see the suppliers available for selection.
This is the total for the invoice. This is prior to any discounts.
The invoice number. If this number was used within the last couple of years, EPASS will warn you this is a duplicate number.
The date of the invoice.
Automatically populated based on the supplier settings (AP Variables tab > Invoices > Due Date Terms and Due Days) and the invoice date.
This is only visible if Tools > System Maintenance > Variables > Accounts Payable > Discounts (checkbox) is checked. This is the amount of the early payment discount.
This is only visible if Tools > System Maintenance > Variables > Accounts Payable > Discounts (checkbox) is checked. This is the date the invoice must be paid by in order to take advantage of the discount amount.
This is only visible if Tools > System Maintenance > Variables > Accounts Payable > Discounts (checkbox) is checked. This will automatically populate based on the settings in the supplier AP Variables tab > Discount G/L field.
This is a text box you can add any information or notes to. You can see the notes in the AP Transactions window if you have the column shown. This note will be searchable in Accounts Payable > Supplier > History after this has been posted.
This is automatically populated from Tools > System Maintenance > Variables > Accounts Payable > General tab > Control Account field. There should be no reason to change this field.
If this box is checked, this invoice will automatically be placed on hold.
If this box is checked, this invoice will automatically be withheld from being posted. This is used when you have an issue with the invoice but still wish to key in the transaction.
Use this field to distribute the payments for this invoice. If you changed this to 3, the section showing Discount above will be replaced with this invoice split 3 ways with the corresponding due dates and amounts of each split invoice. You can make alterations to the dates and amounts, as needed, but they must balance to the full invoice total before you can click OK on the transaction window.
Discount is replaced because you cannot have an early discount on an invoice that has been split.
The total amount of the invoice. The distribution is to the appropriate GL accounts. This must be zero before you can click OK on the transaction window.
If the Purchase G/L field is filled in on the supplier A/P Variables tab, this will automatically populate with the correct amounts distributed to the correct GL accounts. You can add or alter the amounts and GL accounts affected in this distribution and the To Be Distributed amount will update accordingly.
EPASS will not allow you to save the transaction until the To Be Distributed amount is zero.